
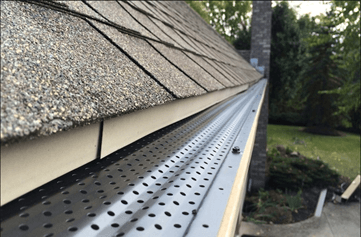
How To Install Gutter Guards starts with one simple rule: do not buy or fasten anything until you know your gutters are sound, your roof can accept the system, and the guard style matches the debris around your home. In Southwest Florida, that usually means evaluating tree cover, roof pitch, gutter condition, and the kind of material that keeps ending up in the trough. If you want the work done correctly for North Port gutters, the safest approach is to treat installation as a drainage project, not just a weekend add-on.
A good installation should help water move freely while reducing the amount of debris that enters the gutter. It should also respect the guard manufacturer’s instructions and local code requirements for slope, fastening, and drainage performance. If you are comparing options, it helps to understand what gutter guards are supposed to do before you start measuring and cutting. You can also review a helpful overview of the benefits here: gutter guard benefits in Florida.
What to check before you install
Start with a full gutter inspection
Before installing guards, inspect the entire gutter system from end to end. Look for sagging sections, loose hangers, separated joints, rust, standing water, and downspouts that are already slow or clogged. Gutter guards do not fix a failing gutter system. If the base system is crooked, weak, or leaking, the guard can make access harder and may hide problems that should be repaired first.Match the guard to the debris
Different properties collect different types of debris. In Southwest Florida, common issues include live oak leaves, pine needles, seed pods, Spanish moss, and roof grit. That matters because not every guard handles every kind of debris equally well.
| Guard type | Best for | Things to consider |
|---|---|---|
| Micro-mesh | Fine debris, roof grit, mixed leaf litter | Needs careful installation and a solid gutter base |
| Perforated aluminum | Larger leaves and general debris | May let smaller material through in heavier grit areas |
| Reverse-curve | Leaves and heavier debris | Can be more noticeable on some rooflines and still needs proper fit |
Check roof pitch and gutter condition
Roof pitch affects how quickly water reaches the gutter and how aggressively it enters the guard. A steep roof can send water at the guard with more force, while a lower slope may allow water to move more slowly. Existing gutter condition matters just as much. If the gutters are bent, undersized, or pulling away from the fascia, fix those issues before installing any guard.Confirm product instructions and approval
In Florida, the guard should be installed in accordance with the manufacturer’s instructions and any applicable product approval. That means the installation method is not something to guess at. If the product specifies certain clips, fasteners, overlap methods, or roof attachment limits, follow those directions exactly.Step by step installation process
1. Clean and inspect the gutters
Remove leaves, sticks, roof grit, and any packed debris. Flush the gutters and downspouts if needed so you can see whether water moves freely. This is the time to spot weak seams, loose spikes, rusted sections, or other damage.2. Repair the gutter system first
Fix anything that could interfere with proper drainage:1. Resecure loose hangers or brackets. 2. Seal leaking joints. 3. Replace badly dented or warped sections. 4. Confirm that downspouts are open and discharging correctly. 5. Make sure the gutter has continuous slope toward the collection points.
Florida drainage requirements call for gutters and downspouts to slope continuously toward collection inlets and avoid pooling. If water sits in the gutter, a guard will not solve that problem.
3. Measure each run carefully
Measure the full length of every gutter section before cutting. Rooflines are rarely identical from side to side, so do not assume one piece fits all. Write down the lengths, note corners and end caps, and plan your cuts so the panels fit snugly without forcing them into place.4. Cut the panels to fit
Use the cutting method recommended by the manufacturer. Clean cuts matter because rough edges can interfere with overlap, fastening, or water flow. Test-fit each section before permanently securing it.5. Position the rear edge correctly
Some systems slide under the first row of shingles, while others are designed to rest differently. Only place the rear edge under the roof material if the manufacturer allows it. Never lift or disturb roofing materials in a way the product does not support.6. Fasten the front edge
Attach the front edge to the gutter lip using the approved clips or fasteners. Space fasteners as directed by the product instructions. Avoid overdriving screws or bending the guard so tightly that water cannot enter the gutter.7. Check alignment at seams and corners
Make sure adjoining panels overlap in the direction the manufacturer specifies. Corners, miters, and end caps often need extra attention because those are the places where debris, splashback, and leaks tend to show up first.8. Test the water flow
Once the system is installed, run water over the roof edge or wait for a rain event and observe the results. Watch for overflow, splashback, and water missing the gutter entirely. The goal is simple: water should reach the gutter, move toward the downspout, and exit without pooling.9. Make final adjustments
If a section is noisy, loose, or causing overflow, correct it before calling the job finished. Sometimes a small adjustment to fastener placement or panel angle makes a big difference in how the system performs.Common mistakes to avoid
- Installing guards on a clogged gutter system
- Ignoring sagging or damaged sections
- Using the wrong guard for fine debris or roof grit
- Overlooking roof pitch and water volume
- Fastening guards without following the product instructions
- Blocking water flow at corners or downspouts
- Leaving pooled water in the gutter
When a professional install makes more sense
Some homeowners can handle simple sections, but others should stop before the first screw goes in. Call a professional if the gutters are high, the roof is steep, the system is damaged, or you are unsure whether the guard will work with your roofing material. A proper assessment can save time and prevent drainage problems later.Frequently Asked Questions
Do gutter guards mean I never have to clean gutters again? No. Guards can reduce maintenance, but they do not eliminate it. Some debris may still collect on top of the system or near corners and downspouts, especially after storms or during heavy seasonal shedding.
Can I install gutter guards on old gutters? Sometimes, but only if the gutters are in decent condition. If they leak, sag, or pull away from the fascia, repair those issues first. Guards work best on a stable, properly sloped gutter system.
What gutter guard type is best for Florida homes? There is no single best option for every home. The right choice depends on the amount of tree cover, the type of debris, roof pitch, and the condition of the gutters. Micro-mesh, perforated aluminum, and reverse-curve systems can all make sense in different situations.
Do gutter guards change how water drains? They should not, if installed correctly. A properly installed system still allows water to enter the gutter and move to the downspouts. If overflow starts after installation, the guard may be the wrong fit, poorly installed, or placed on a gutter that needs repair.
Is gutter guard installation a simple minor repair? Not always. Because it affects drainage components and must follow product instructions and applicable approvals, it should be treated as a real installation project rather than a quick patch.
If you are planning gutter guards for a Southwest Florida home, the most important step is not the fastening itself. It is choosing the right system for your roof, your debris load, and your existing gutters, then installing it so water still moves exactly where it should.
Need Help With Your Gutters?
No Leak Gutters handles all gutter installation, repair, and maintenance across Sarasota & Charlotte Counties. Get a free estimate today.
Related Gutter Services
Learn more about the services mentioned in this article.